My brother and I installed some pavers for my parents a couple weeks ago. In the past I've had a lot of floor installation jobs, but I've never done pavers. It's not too hard. Most of the work is prep.
First focus on getting level ground at the height you need. In our case, this meant that the pavers would end up flush with adjacent concrete. Account for a layer of sand, which in our case would be 3/4 inch. Focus on water flow if relevant--we wanted a slight tilt away from the house.
Rent a dirt compactor. Use your old skateboard to transport it from truck to work site (Figure 1).
![]() |
Figure 1
|
Go around the area several times (Figure 2).
![]() |
| Figure 2 |
You will want your sand layer to be flat and appropriately level. A good way to do this is to get some pipes with the right diameter, then drag sand across them with a straight 2x4 (Figures 3-4).
![]() |
| Figure 3 |
This can be tricky if you have obstacles in the patio, like the tree above.
![]() |
| Figure 4 |
As you lay the pavers, you can fill in the holes left by the pipes. Lay the pavers straight down; if you have to drag them into position you will get sand between them and have a bad fit. Getting flush next to concrete may require some improvisation; in my case we had to bring the sand up a bit, which was fine since we want water flowing away from the house (actually, we laid them slightly higher than flush, to allow compacting).
![]() |
| Figure 5 |
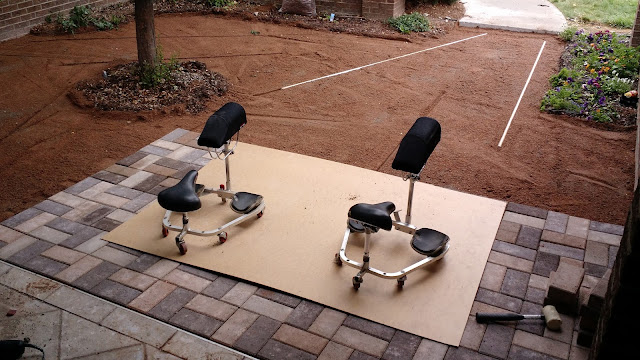
The carts pictured in Figure 5 are by
Racatac. I used them a lot when I installed carpet for a living; they are also good for tile and, obviously, pavers. These will make a huge difference for your back and knees. If you ever do a flooring job, buy or borrow some. For jobs like tile and pavers, you need a board like the one pictured so the cart wheels don't screw up individual bricks.
![]() |
| Figure 6 |
![]() |
| Figure 7 |
In the early part of the job, we kept the tiles square against the house, which forms a (somewhat) right angle for us. You can see in Figures 6 and 7 that we had to build a bridge to the sidewalk and lost the house on the right side due to a flower bed. Use a string to make a straight line. You may think you can lay bricks straight, but you can't.
Our biggest obstacle was the tree in the middle of the patio. We had to wrap the bricks around this and meet behind it, which always presents a challenge. Again, we used a string to keep lines straight (Figure 8).
![]() |
| Figure 8 |
Figure 9 shows things coming together.
![]() |
| Figure 9 |
My mom wanted round corners on the tree and flower beds. This is a part that takes a lot of time. You can do this with a tile saw, but it's cheaper and just as easy to use a grinder with a masonry blade (Figure 10). If the blade isn't large enough, you can score the bricks then break them (carefully).
![]() |
| Figure 10 |
Figure 11 shows the result.
![]() |
| Figure 11 |
Around flower beds, insert plastic border to hold bricks in place. This is harder than it looks (Figure 12).
![]() |
| Figure 12 |
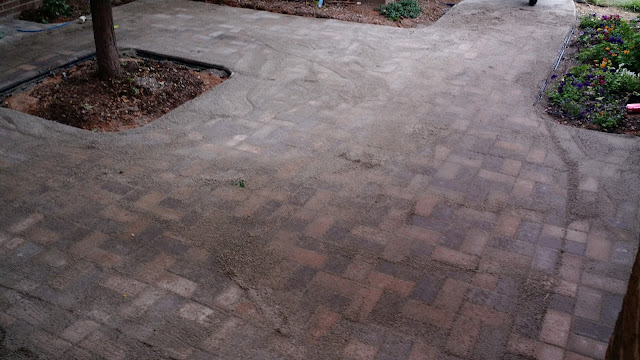
The last step is to sweep fine sand over the bricks. This will fall into the cracks and act like grout, keeping the pavers as laid and preventing wobbling. It will take many, many coats to fill in all cracks. Spread, spray with water, allow to dry, repeat. Figures 13-15 show the process.
![]() |
| Figure 13 |
![]() |
| Figure 14 |
![]() |
| Figure 15 |
The grouting isn't quite finished, but it's just a matter of a few more coats.
Pavers look nice, but a key advantage over concrete is that they can be spot repaired. This particular patio has a tree in the middle that must be watered; as a result, the concrete that was there before was constantly settling and buckling. Repairing concrete is expensive; replacing a few pavers is cheap.
![]()